Friday, March 29, 2013

"THROWBACK THURSDAY: FUN EASTER-THEMED HAIRSTYLE!!"

This is a RE-POST from my old blog........

"It's Easter Sunday!! And kids love this day because of the Easter Egg Hunt events! But, most of all we should remember that on this day our Lord has risen again.

Just to join the fun of it, we re-created a hairstyle we saw on CUTE GIRLS HAIRSTYLES. It is literally an "Easter Egg Hairstyle" because you are going to use cute colorful plastic eggs in order to do this hairstyle. See my pic below:


It is so easy to do!!! And all you need are elastics, ribbons, and those cute, colorful plastic eggs. 

First, all you have to do is part your daughter's hair from top to bottom to make 2 ponies or pigtails. Tie them first with a black elastic. 

Now on the first ponytail, divide it into 4 equal parts. Each part you will braid normally (simple 3-strand braids), and tie the ends with different colored elastics. Do the same thing on the other half pony.

Now, wrap an elastic around the braids about an inch or 2 below the top elastic. Once you tied them already, you can insert one colored Easter egg. Just adjust the tightness of the elastics below the egg. For additional security, wrap another elastic in the middle of the egg/braid.  Do another of this set and then you can tie the ends with an elastic or ribbon. Then do the same on the other pony tail. See pic below for reference:


You can add your fave colored ribbon to add some spice and fun to this hairstyle. You can add the ribbon on top or at the bottom of the pony tails.


And that's it!! I hope you guys try it. Happy Easter!!"

**Don't forget to watch out for our NEW EASTER HAIRSTYLE 2013 post**

Lots of Love,

Sunday, March 24, 2013

"Our Palm Sunday Hairstyle 3-24-2013"

Here in the Philippines, we Catholics are now celebrating "PALM SUNDAY". It culminates the start of the Holy Week.


My daughter and i went to church and attended the mass. 

inside the church people lined up with their palm leaves

Palm Leaves being waved at the start of the mass
to be blessed with Holy Water


Anyway, I would like to share to you my daughter's hairstyle when we went to church. It was inspired from Princess Hairstyles  http://www.princesshairstyles.com/ and it is called the "curvy french braiding-cascading veil".


This is the original hairstyle that inspired me to do
it's from PrincessHairstyles.com
The way i did this hairstyle was a bit different from Kori's original hairstyle. Though i did the same braids on both side, the difference is how i did the cascading braid/veil on the middle part of the hair. Plus, i ended this hairstyle in a braided ponytail. 

This is how it turned out/look like on my daughter's hair:


As you can see at the back i ended it into a braided ponytail. To achieve this, i first tied the 2 side braids to the remaining loose hair into a pony. Then the 3rd braid (the one in the middle) i wrapped it around the ponytail. Then i made a simple plait braid.

I added some cute hair accessories. On top is a black velvet small hat clip and at the bottom of the ponytail i added a black flower clip. 


Plus, i so loved these pretty butterfly earrings she wore.


These we all purchased at an accessory/jewelry store named BROADWAY GEMS.

Now if you wanna do the original hairstyle from PrincessHairstyles.com, just click the link below and you will see a video tutorial also for the said hairstyle:
http://www.princesshairstyles.com/2011/07/cage-braids-curvy-french-braided.html

Have a blessed Sunday to all!!

Lots of Love,
Saturday, March 23, 2013

"IT'S OFFICIALLY SUMMER TIME!!"

It's the end of School Year 2012-2013, Graduations, Recognition or Moving Up Ceremonies, and an early Easter Egg Hunt.......It is definitely SUMMER in the Philippines!!


This March a lot of students will bid their schools, classmates, teachers & friends goodbye. Some will graduate (either from elementary, high school, or college), some will transfer to different schools and some will simply just have their SUMMER VACATION.


My daughter is officially on her Summer vacation now. It started last March 16, 2013. And when it's Summer vacation, it means going over to my parents' house to spend her vacation with them & her cousin Aaron.

We are also celebrating, starting tomorrow March 24 Sunday, the HOLY WEEK. Tomorrow Sunday is Palm Sunday. And after 1 week we will be celebrating EASTER SUNDAY!

Last Thursday, March 21, 2013, my daughter together with her cousin had an "early" Easter Egg Hunting event. It was held in my sister's office at ABS-CBN.


Here is my daughter's hairstyle and outfit for the said event:


I call this hairstyle the "TWIST LACE BRAIDS & TWISTS PONYTAIL". I think I am loving a lot of "twists" hairstyles nowadays. They are so fun to wear especially this Summer time.


Here is my daughter's outfit. The sheer top and the cute shorts are from the brand WITCHERY from Australia. My aunt gave it. Her accessories (bangles & earrings) are from FOREVER 21. My daughter looked like a young lady already here:


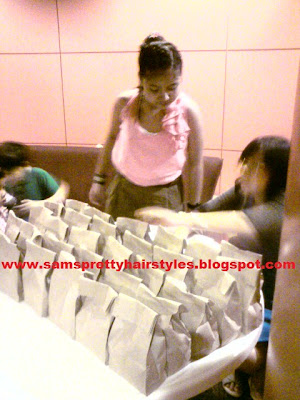
My daughter & nephew had so much fun. They enjoyed the loot bags they got plus some prizes because they were part of the TOP 5 Early Bird Awardees plus they both got 2 special Easter eggs which they can exchange for prizes.


Here are some of the yummy treats being offered to the kiddos at the said event. And mind you, they can take as many as they want from these yummy treats:


It was a fun, fun, fun day for the both of them. They really enjoyed this kind of activity together.

I'll be posting some more "EASTER-inspired Hairstyles" again next week. So watch out for it.

By the way tonight, here in the Philippines we will be participating in the so called EARTH HOUR, wherein we will be turning OFF all the lights from 8:30-9:30 PM.


Let us all join this Global Community in saving our planet Earth.

'Til next time....Happy Hair Styling, & Happy Summer to all!

Lots of Love,

"ARTS & CRAFTS: Hair Accessories!!"

I found a new interest last month (as i am still reading posts from my fave hair bloggers).......ARTS & CRAFTS!!! And I am starting to learn on how to make your own HAIR ACCESSORIES from things found in our very home!

I've read a post from 2 of my fave hair bloggers:
Becky of BABES IN HAIRLAND 


and Kori of PRINCESS HAIRSTYLES 


Both bloggers show tutorials on how to make your own hair accessory like a HEADBAND.


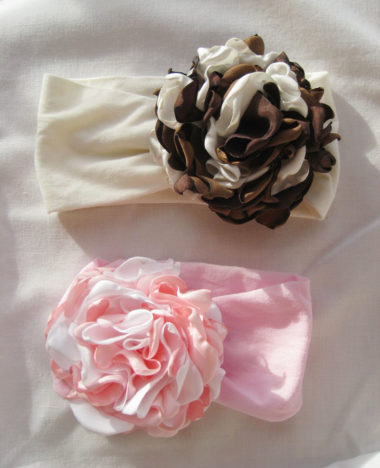
Becky, mom of 3 beautiful girls known as Goose, Bug & Bee and the owner/blogger of Babes in Hairland, made this cute Nylon Headbands from baby/ballet tights.

It's actually pretty easy to do. All you will be needing are the nylon tights, scissors, measuring tape, lighter (to burn seal the edges of the tights), needle & thread, ribbons & glue gun.

You can also add up some other things to accessorize your headband once it is done such as a cute ribbon, flowers, or gems/crystals. Here are some of the examples of the nylon headband where flowers were added:


2) POP-TAB RIBBON HEADBAND by PRINCESS HAIRSTYLES 


Kori owns the blog/website The Story of a Princess & her Hair. As most of you who follows/reads my blog, knows that this is the first hair blog that taught me hair styling!

Anyways, who would've thought that you can make a wonderful hair accessory using POP-TABS?!?!?!! Well, this is definitely a first for me. I never knew you can do many things using pop-tabs. When i saw this in Kori's blog, i was so amazed!! This hair accessory is so pretty! She said she saw this on Youtube and tried doing it too.

To make this, you will be needing lots & lots of pop-tabs (so start collecting them now) around 45-50 pieces, 7-8 feet long of any of your choice ribbons, 2 small safety pins, & scissors.

She made a headband, belt, and her daughter made a bracelet using the pop-tabs. It all depends on how long you are going to make it. Check out the pics below:

pop-tabs made into a stylish belt

pop-tabs ribbonheadband

Here's the link to the video tutorial of this project:


Right now, i haven't done any of these yet. As for the nylon headbands, well, i already gave away my daughter's old ballet tights. Too bad :(  So i have to either buy new ones or ask from friends who have baby girls who doesn't use their baby tights or ballet tights anymore :)

For the pop-tabs headband, i am still collecting pop-tabs. WOW! finding them is kinda hard. I have to ask friends, family for them to save pop-tabs and give it to me.

Once i start making them and finishing doing these crafts i will be proud to show it to all of you!

So, try them out too guys! It will be a nice project!

Happy crafting everyone!!

Lots of Love,

Thursday, March 21, 2013

"CRAZY FOR TWISTS!"

Last time we posted a hairstyle called "TWIST LACE BRAIDS & PONYTAIL TWISTS". My daughter loved that hairstyle.

We are now posting another hairstyle we saw from our favorite hair blogger and it's also a TWISTS hairstyle.
Here's the new hairstyle my daughter is sporting and loving now and we are calling it "CRAZY FOR TWISTS":


We super love this hairstyle we saw on Kori's blog  PRINCESS HAIRSTYLES . And i thought that this would be nice to wear this summer especially if you go to the beach. And it's pretty easy to do. Though, it took me 45 minutes to finish these all up! But, it's all worth it! 


this is princesshairstyles.com pic which inspired us.
If you are to do this hairstyle you need to use the colorful elastic bands. Because it gives the hairstyle some additional fun and color with the use of different colored elastics.


GOING CRAZY ABOUT TWISTS!! 


I first made 4 parts in her hair from side to side. Starting from the first part on top, i divided this into 6 equal parts. I tied each of the 3 parts on the right with same colored elastics (yellow green) and the 3 pars on the left with pink elastics. Now each of this part i twisted and temporarily tied them.

Now on the 2nd side-to-side part, i divided them too into 6 equal parts. Getting the 3 twists from the top right part, tie each of them to the 3 parts on the left of the 2nd side-to-side hair part. Do the same on the remaining 3 twists on the left top part and tie them each on the 3 remaining parts on the right of the side-to-side hair part. But, this time you weave each of these twists first on the first 3 twists you tied. Now you will have 6 mini ponytails on the 2nd side-to-side part of the hair.

Then you can do the same step again on the 3rd side-to-side part. And on the 4th part you just tie them and twists them. The final look of this would be 6 twisted ponytails.

For more detailed steps on how to do this hairstyle go to http://www.princesshairstyles.com/2008/07/twist-twistand-twist.html

Enjoy this hairstyle everyone!!

Lots of Love,

Monday, March 18, 2013
"TWIST LACE BRAIDS & PONYTAIL TWISTS"


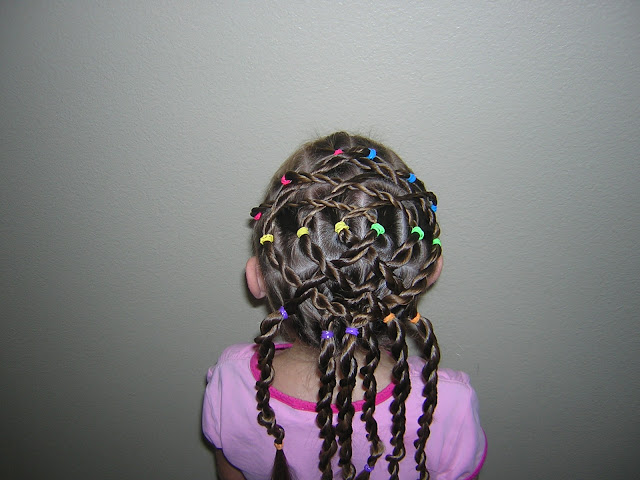
We are so loving this hairstyle i did  on my daughter's hair this weekend. It's basically a "TWIST or ROPE Braids". 

The top part I made into a "Lace Braid" type of twist. Thus, the "Twist Lace Braids". I made one of each on both sides.

Then I gathered the rest of the hair into a ponytail. I then made several little twists/rope braids to make it look more "FUN" and give this "Summery Look".

Here are some more pics of our featured hairstyle:


A view of the whole hairstyle

A closer look on the "TWIST LACE BRAIDS"

The smaller twists in the ponytail made this hairstyle more FUN!

The view at the back
I hope you liked this hairstyle too. This one is very easy to do. You only need 2 strands of hair to make the twists.

Have FUN!! BTW, EASTER is coming soon!!! Watch out for FUN EASTER HAIRSTYLES!!

Happy Hair Styling!!

Lots of Love,